Our Research & Development Journey
Problems we’ve identified and how we’ve come to solve them
While dreaming of a single-wheel trailer for adventure touring motorcycles, we had a lot of ideas on how to accomplish it. We knew it must have one wheel. We knew it would attach to the bike’s rear axle in order to keep the weight off the bike’s suspension. We knew it would be aluminum for the best balance of strength and weight. But there were more unknowns than knowns. Here are just a few of the issues we came up against, and how we solved them.
| Challenge | Solution |
| How to optimally design and manufacture the ADV1? Welded tubes? Other? | Frame components cut out of 6061-T6 ⅜” aluminum plate by a CNC router and bolted together. Welded aluminum tube construction is too expensive and slow. Read More. |
| How to make the trailer stable at high speeds? | Patent pending trapezoid hinge. Read More. |
| How to source a high quality, low pressure air shock absorber? | TeamFast’s M-10 shock slightly modified. Read More. |
| Which tire is best for the ADV1? | Bridgestone Battlax BT46. Read More. |
| What size wheel is best? | 17” x 2.5” Read More. |
| How to easily connect the lighting system to a variety of motorcycles? | Partner with Denali Electronics. Read More. |
| How to attach panniers, coolers, dry bags, and more to the ADV1? | A combination of channels for t-bolts and our custom mounting plates. Read More. |
| How to connect to the rear axle of many different makes and models of motorcycles, especially single-swing arm bikes like the BMW R1250GS? | Purchase actual axles and final drives from Ebay, or new as replacement parts and design around them. Read More. |
| How to connect the trailer to the axle adaptor? | Simplicity is the answer—make a slot on the hitch arm that captures the spool on the end of the axle adaptor. Read More. |
| How to keep a one-wheeled trailer upright when it’s parked? | A combination side stand and center stand. Read More. |
| How to configure a shock horizontally so it doesn’t take up too much room in the trailer? | A highly sophisticated linkage system that places the shock horizontally and translates the 2” of shock travel into 6.5” of suspension travel. Read More. |
| How to make the trailer track perfectly behind all the different makes and models of motorcycles? | A centering plate that mounts to the trailer on one side, and the hitch arms on the other, allowing different configurations of where the hitch arms are in relation to the trailer. Read More. |
How to optimally manufacture the ADV1?
From the very beginning, we assumed that we would be welding aluminum tubes to make the frame. In order to do a detailed frame like what we required, all of the tubes would need to be cut by an industrial multi-pivot laser.
We didn’t think too much about that until we started to look into It, and found that cutting the tubes for two prototypes was going to cost $10,000. We hoped that when we got to production scale that cost would go down considerably.
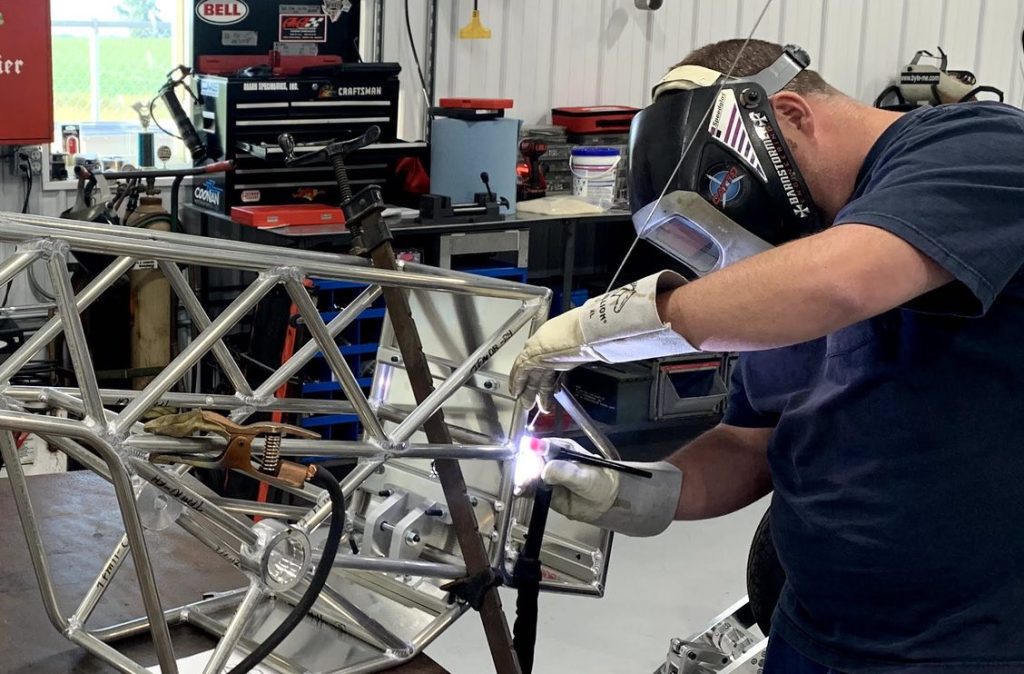
We took our very expensive cut tubes to our welding partner, Alex at Barnstormer, and he and his team did an amazing job of building the jigs and welding our first two prototypes. After the prototypes were assembled, Alex pulled us aside and said there is no way we were going to be able to do welded tube frames due to the need for master welders, the time required, and the costs that all of that involves.
But he had a solution: cutting the main frame components of the trailer out of ⅜” aluminum plating using an industrial CNC router. Once the pieces were cut and milled perfectly, we would then bolt the whole frame together.
It took a while for some of our team to digest this, but in the end we realized it was an absolutely amazing solution that was going to allow us to make an even better trailer. Some of the advantages are:
- A bolted-together frame can be repaired. A welded frame can only be repaired using specialized welding equipment which is not available everywhere around the world. But by making the frame out of component pieces and bolting them together, we can replace any of those components if they are damaged rather than having to somehow straighten or weld the frame.
- A bolted-together frame is much lighter than a welded frame. Our first bolted prototype is 25 lb lighter than our first welded prototype. That is an amazing difference.
- We can make changes to the design quickly and easily.
- A bolted-together frame will be not only stiffer, but also straighter than a welded frame.
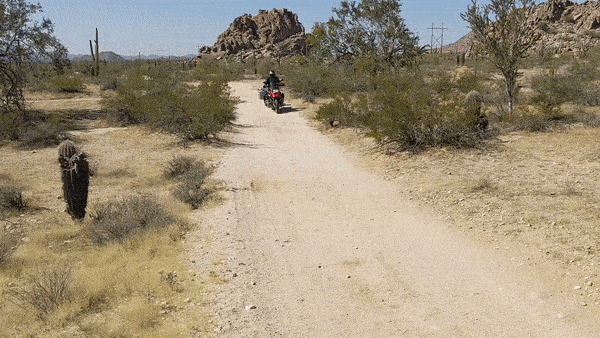
How to make the trailer stable at high speeds?
While planning and dreaming about the trailer, we thought that off-road handling would be the biggest challenge. But as we progressed, we began to realize that high-speed stability was actually a much more difficult hurdle to overcome.
Our first prototypes all performed amazingly off-road, and they performed very well on pavement at speeds up to about 40 or 45 miles an hour. However, once we went over those speeds, the trailer began to wobble too much for our liking.
Frankly, we were wondering if we would ever be able to solve this problem and if all of our dreams and hard work were going to come to nothing. There was no way we were going to produce and sell a trailer that could not travel at the speed limit of a normal expressway.
But then our engineer, Luke, came across something that was very interesting: a trapezoid hinge. He had found videos on YouTube showing this quite old technology (first used in the late 1800s) stabilizing large trailers being pulled behind pickup trucks. He began to wonder if that solution would work for the ADV1.
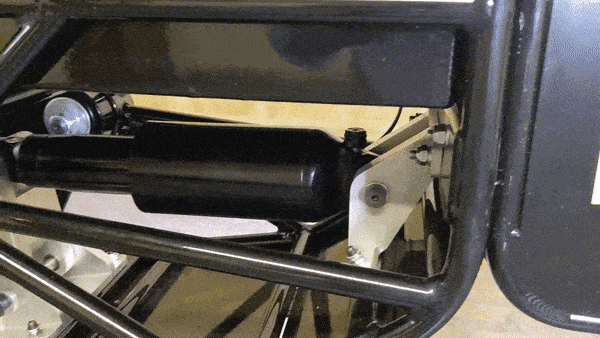
We designed a proof-of-concept version of a trapezoid hinge, which used off-the-shelf components. (See the gif above.) We were able to put this together in a couple of weeks and mount it to one of our prototypes. We had no idea how it would handle. The first test we did was performing a lot of slow speed turning and maneuvering to see if it would feel any different than the hinge we were replacing. It didn’t—it felt perfectly normal.
Once that was established, we headed out to the highway with the trailer unloaded. We immediately felt an amazing sense of relief and accomplishment—as we got to 50 miles an hour, and then 60, and then 70 and the trailer was perfectly stable! In fact, we couldn’t feel it at all. We loaded up the trailer with 80 lbs. of sand and headed back out onto a nearby interstate highway. We quickly were traveling over the speed limit and found it to be completely, totally rock solid. We had our solution!
The very next step we took was to call our patent attorney. She did some digging and came back with amazing news: there were no patents around using a trapezoid hinge in the application of a motorcycle pulling a one or two wheel trailer. We filed for a patent pending that same day.
The proof-of-concept version of the trapezoid hinge looked nothing like how we envisioned it for the final product, so we made one more prototype of the hinge that looked more like the final version would. This intermediate prototype worked even better than our proof-of-concept prototype and we were thrilled with the results.
We have now integrated the trapezoid hinge into the frame of the ADV1, making it even stronger. As of this writing, we have the parts on order for this final design and we will be reporting to everyone how it performs! Because it is based off of our intermediate prototype, we are very confident our high expectations will be met.
How to source a high quality, low pressure air shock absorber?
Never in a million years did we think that finding a shock absorber for our trailer would be one of the most difficult obstacles we would have to overcome, but it turned out to be a long, slow process with many false starts.
We started with an off-the-shelf, expensive air shock intended for the Harley-Davidson aftermarket. It was actually a really good shock, made by a big name brand and then rebranded and sold by a large HD aftermarket company.
We were very impressed with it, but the company that rebranded it and sold the shock was not interested in working with us to buy them at volume. Our next step was to contact the big name shock company directly to see if we could work with them.
We spent over three months working with them as they led us through several different options, including high pressure bicycle shocks and snowmobile shocks. Eventually we found one of their shocks that we thought was very close to what we wanted and their engineers said they would customize it for us.
We began designing the very intricate suspension linkage that would work with that shock, but eventually we were told by the big name company that they could not work with us because motorcycle trailers were not an intended use of any of their shock absorbers. We had to go elsewhere.
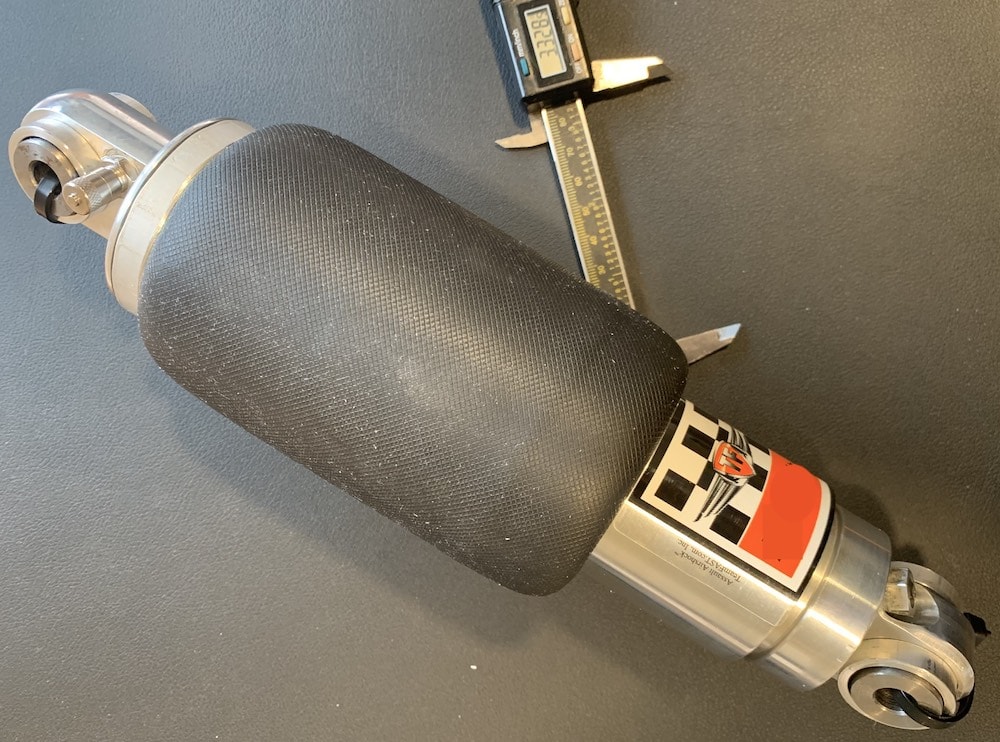
Eventually we found TeamFAST, a snowmobile suspension manufacturer in northern Minnesota with an amazing track record and highly impressive design and specifications for their air shocks. Unlike the big name shock absorber manufacturer, TeamFAST welcomed us with open arms and was very excited about the ADV1. One of their shocks, the M10, was originally designed for the rear suspension of a professional racing snowmobile, but was nearly exactly what we wanted for a shock for the ADV1.
TeamFAST told us they could customize the M10 to what we needed, and they delivered the prototype in short order.
The M10 is amazing—it has been tested in brutal real-world conditions for many years. It also only requires low pressure to work, so that means it’s preload can be adjusted using any motorcycle tire pump, any gas station tire pump, and even any bicycle tire pump. We are super excited that it is the shock we will be using in production.
Which tire is best for the ADV1?
We’ve tried many different tires on the ADV1 and all of them worked just fine. We really didn’t know which direction we wanted to go, but were more inclined towards something a little lighter and road focused (80/20, 90/10), as opposed to a tire with aggressive tread, which is much heavier. Because the ADV1 is being pulled, there’s very little need for an aggressive tread design, no matter what type of surface it’s being pulled over.
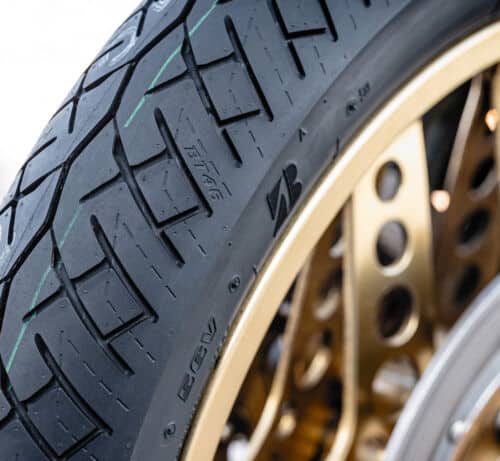
Then we saw this video from the amazing Ryan Fortnine and knew that we had our solution: the Bridgestone Battlax BT46. Ryan’s explanation of how the Battlax’s pneumatic trail means it is a self-centering tire, and that adds yet another layer of stability on top of our trapezoid hinge.
What size wheel is best?
We spent a lot of time researching this question. We knew we wanted an ADV front hub. We also knew that many, if not most, ADV bikes have a 17” rear rim and we were hoping to find a rather wide 17” rim so that the tire on the ADV1 could be used—in an emergency—as a spare for many ADV bikes. However, it couldn’t be too wide! Most 17″ rims are made for the rear of ADV bikes and were too wide.
We came to the conclusion that we needed a front hub and a narrow rear 17” rim. After looking at rim/tire-fit tables we decided to go with a 2.5”-wide rim. That width would give us the maximum number of tire options for our users. The problem is, nobody makes a 17″ by 2.5” wheel with a front hub.
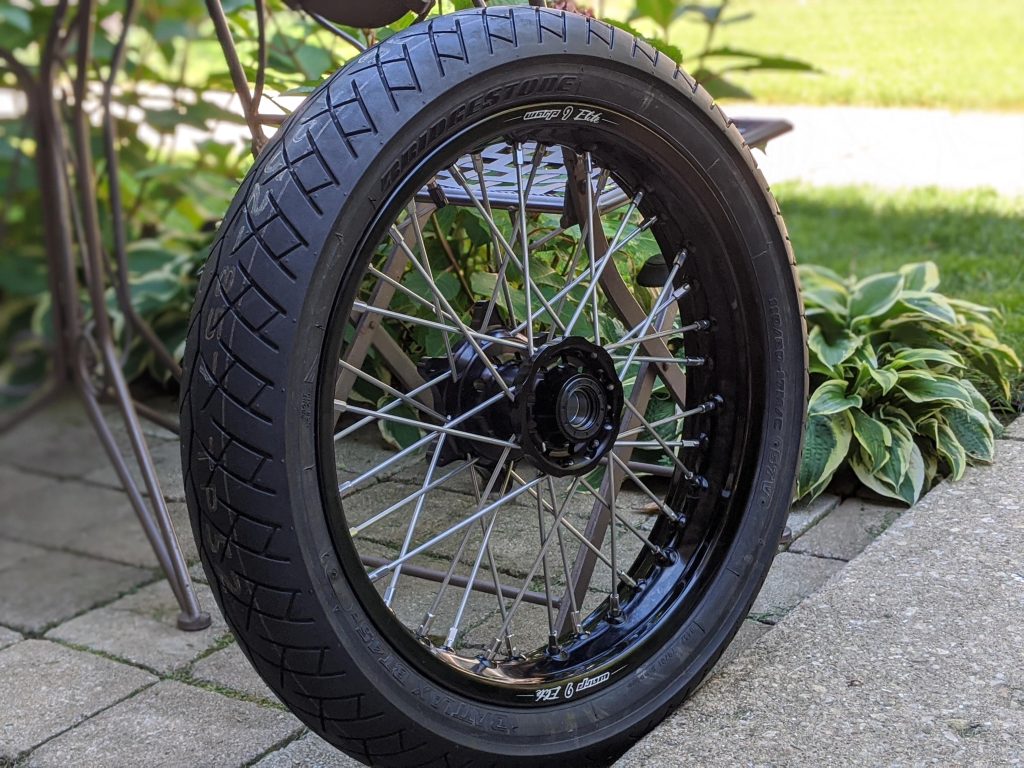
We ended up calling the amazing people at Warp9 and they agreed to make us a couple of custom prototypes. The wheels were amazing and we are going into production with a spoked 17” by 2.5” wheel with a front hub.
How to easily connect the lighting system to a variety of motorcycles?
The ADV1, of course, had to have running lights, brake lights, and turn signals. When we first showed the ADV1 prototype at the BMW MOA rally in Great Falls, Montana in the summer of 2021, we did not have lights on it. The folks at Denali Electronics came by our booth, noted the lack of lights, and basically told us that they were going to be our wiring harness and lighting supplier. We knew nothing about wiring harnesses, so their offer sounded fantastic. Little did we know how fantastic it really was.
Not only does Denali make amazing lighting solutions, but they also make wiring harnesses for most of the popular ADV motorcycles. That little fact means that if a person buying an ADV1 doesn’t know how to create a wiring harness for their motorcycle to power the lights on the ADV1, they can just buy one from Denali and generally just snap it into place. This solved an enormous problem we hadn’t thought of beforehand— how to make it easy for people buying the ADV1 to connect it to their motorcycles.
The ADV1 comes with Denali’s T3 Switchback Signal Pods, which provide running lights, turn signals, and brake lights in one small, ultra bright package. We love them!
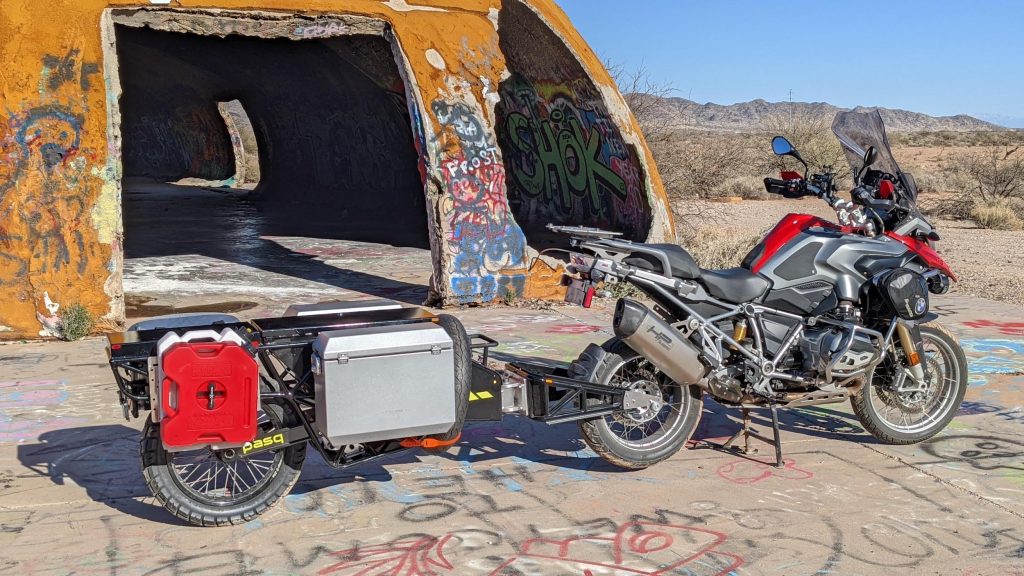
How to attach panniers, coolers, dry bags, and more to the ADV1?
One of our goals from the very beginning was to allow riders who already own panniers to be able to attach those panniers to the ADV1. The obvious solution was to create a mounting plate that had all of the holes and slots needed for the mounting hardware of all of these various panniers. However, we also had to figure out how to attach the mounting plates to the frame of the ADV1.
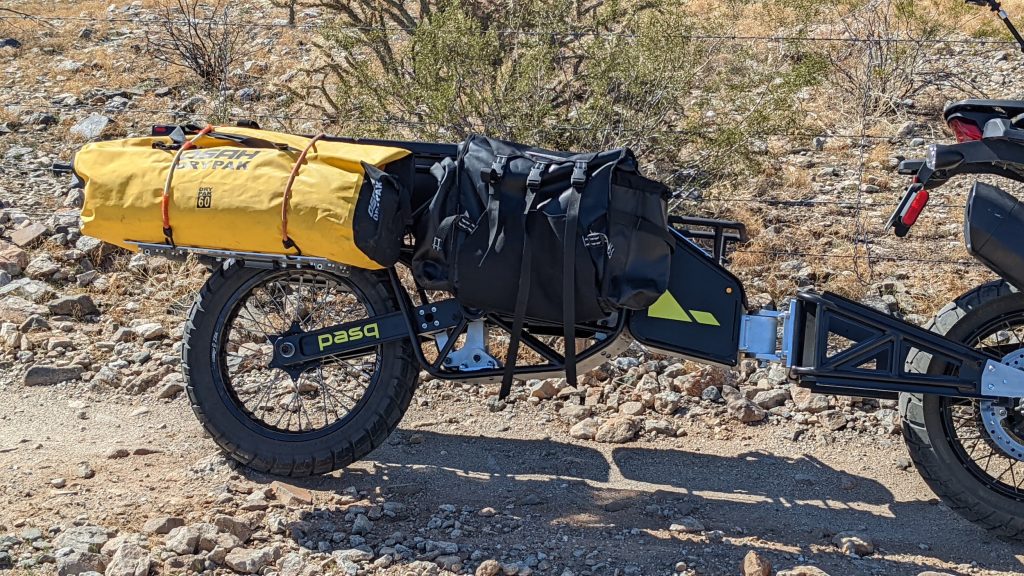
For a first prototype, we 3D printed some very elegant clamps that allowed us to attach our mounting plate to the tubing of the ADV1. When we made the decision to move away from a welded tubing frame, toward a CNC-machined frame, we took it as an opportunity to improve the mounting system.
We designed the new frame with channels that allow for T bolts (also called T slot bolts) to be used. We can then directly attach our accessories and even some panniers. However, it also allows us to easily connect our mounting plates, which then facilitates attaching nearly all popular motorcycle panniers.
We also wanted to facilitate people being able to bring coolers and dry duffel bags on the one. The obvious answer to this problem was a shelf that could fold up when it wasn’t being used. The shelf we designed makes it easy to strap coolers, dry bags, and whatever else you would like to put on it, to the ADV1.
How to connect to the rear axle of many different makes and models of motorcycles?
One of the founding design principles of the ADV1 is the idea of connecting the trailer to the rear axle of the towing motorcycle. We did this to provide a very stable platform, but also to remove the weight of the trailer and what it is carrying from the motorcycle’s suspension.
The issue we hadn’t thought of was, how do we get ahold of all of the different motorcycles we want to connect to so we can measure and design the perfect axle adapter. We have access to a Yamaha Super Ténéré and a Harley-Davidson Pan America, but there are a lot of other bikes out there that we need to be able to connect to—namely the BMW R1200/1250GS.
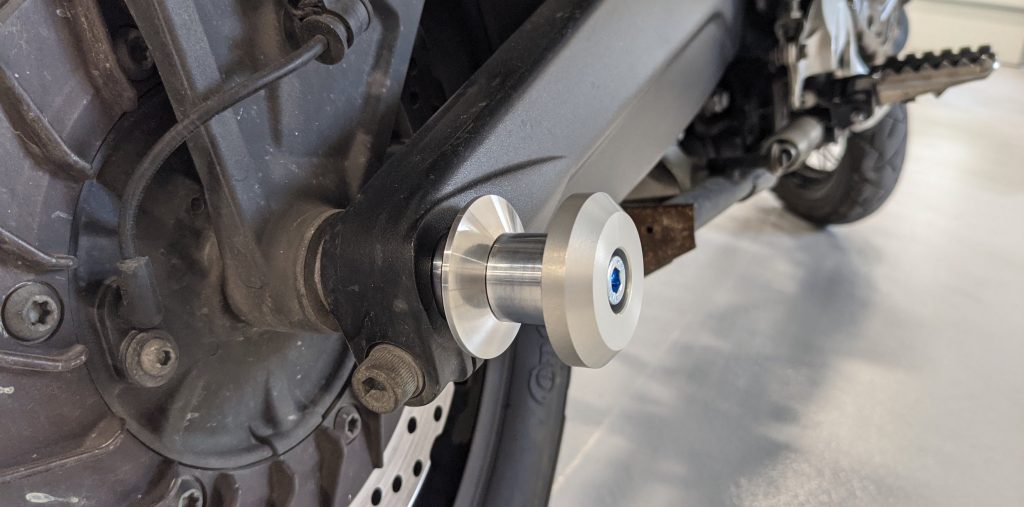
The solution came in the form of eBay. We found that we could buy the final drive unit from a 1250GS, which led us to design the perfect axle adapter for it. When we needed to attach the ADV1 to a KTM Adventure, we ordered a rear axle from KTM, which led us to precisely design the axle adapter for it.
Next was the Honda Africa Twin. We were able to find a used axle from the year that we needed on eBay. So this is how you know that our axle adapter will fit your bike perfectly. We have a very large collection of ADV motorcycle rear axles and we design the adapter to fit them perfectly.
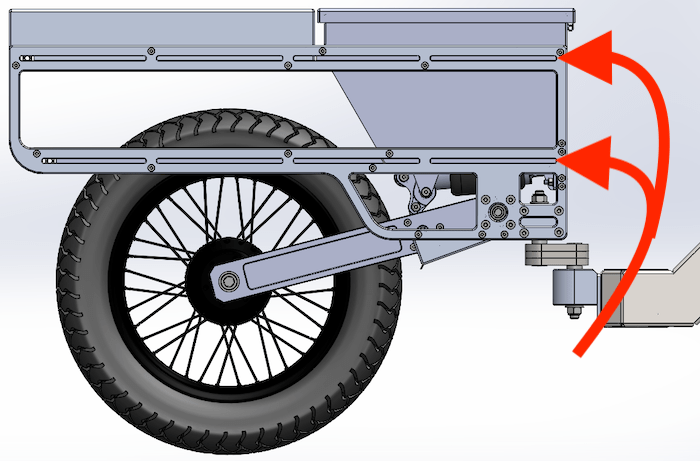
How to connect the trailer to the axle adaptor?
We’ve gone through a lot of different design ideas to answer the question of how do we connect the trailer to the axle adapter on the motorcycle in a way that makes it easy for it to be removed, but still be solid and secure. The final solution—as is often the case—is quite simple: we are making the arms of our hitch out of steel plate, and we will have a slot in the steel arms that slide over the spools on the end of the axle adapter.
Then we have a mechanism, that can be locked, to tighten the spool inside the slot. The result is a strong secure connection between the hitch arms and the motorcycle. It also means that the trailer can be locked to the motorcycle so it cannot be easily wheeled away.
How to keep a one-wheeled trailer upright when it’s parked?
One issue that we hadn’t thought out completely when we started working on the ADV1 was how it would remain upright when the motorcycle was on its side stand. The issue is the bike leans to the left when it’s on the side stand, and that means the ADV1 will lean also. We knew that we would want a center stand with wide legs on the ADV1 so that it could stand on its own when not connected to a bike.
One of the happy coincidences of moving forward and being confident that the solutions will come was, when we attached a heavy duty bicycle center stand to the ADV1, we realized it could also act as a side stand.
When the ADV1 is connected to an upright motorcycle (either on its center stand or just being held upright by the rider), and the center stand on the ADV1 is lowered. It does not touch the ground. However when the bike is leaned over onto its side stand, the left leg of the ADV1 center stand just touches the ground, giving the ADV1 its own side stand.
We have lots of ideas and dreams around our stand, such as tying into motorcycles’ canbus system and having the center stand lower itself whenever the bike comes to a complete stop. When the bike begins to move, the stand retracts. Another idea is to have adjustable length legs on the ADV1 Center stand so they can be adjusted to all the different lean angles of all the different motorcycles the ADV1 will connect to.
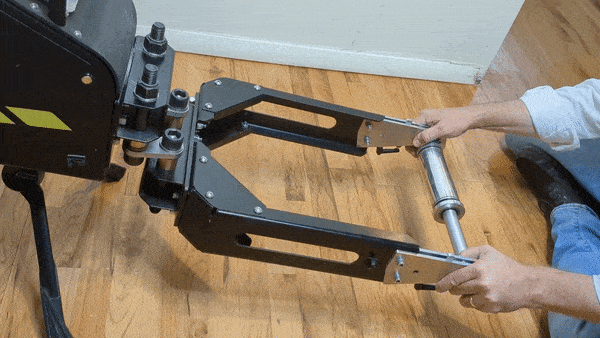
How to configure a shock horizontally so it doesn’t take up too much room in the trailer?
When we first started thinking about the ADV1, we assumed the shock would just be vertically mounted and in the right position so that the travel of the shock would be translated into several more inches of rear wheel travel. However, as we got further and further into the design, we realized that if the shock was simply vertical it would take up too much of the internal storage capacity possible in the ADV1.
We began to think about how to create a linkage system that would allow the shock to lay horizontally and still have that system translate an inch of shock travel into multiple inches of wheel travel. A lot of trigonometry, geometry, and CAD software assistance later came an elegant linkage system that solved the problem. It adds some complexity and some cost to the ADV1, but we think it is absolutely worth it.
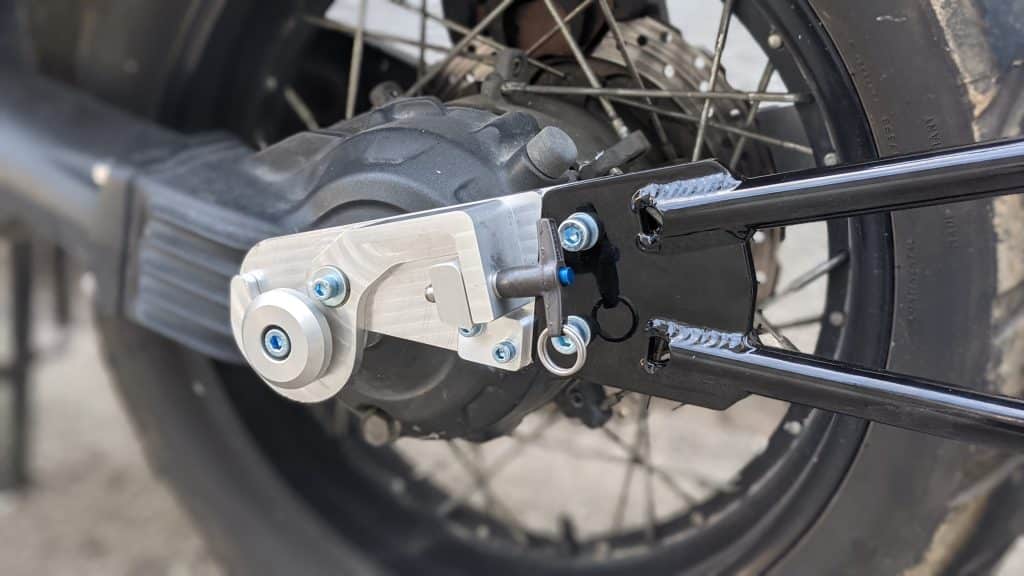
How to make sure the trailer tracks perfectly behind all the different makes and models of motorcycles?
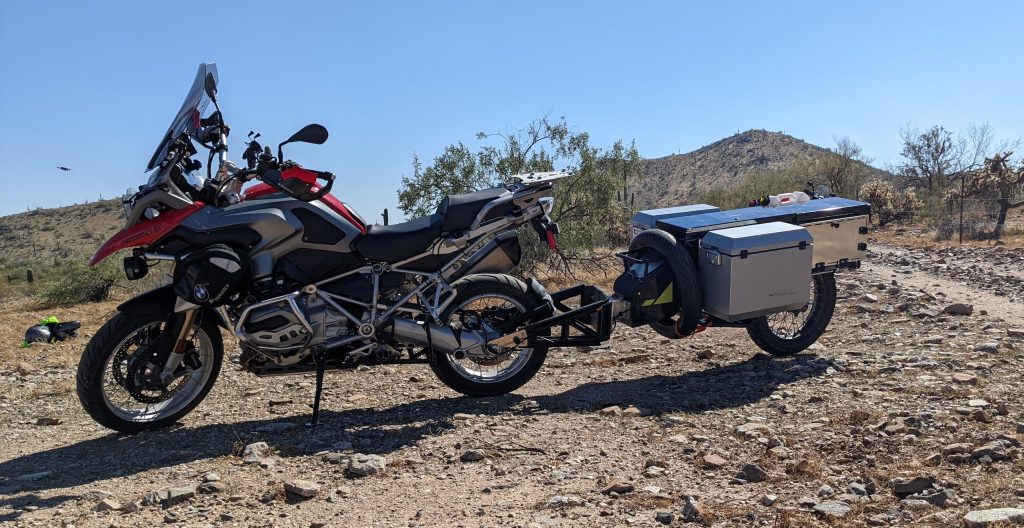
One of the most important aspects of the ADV1 is that it is in perfect alignment with your motorcycle. When you go straight through water pulling the ADV1, only one track will exit the water. All three tires are in perfect alignment. When you lean through a curve in the road, the ADV1 follows the exact same track as your bike through the curve.
This had to be maintained no matter which make or model of motorcycle was pulling the ADV1. Rod’s Yamaha Super Ténéré’s rear axle assembly is nearly perfectly symmetrical, but not quite. However, the BMW R1250GS has all its drive and suspension hardware on the right side of the wheel, and nothing but a big hole on the left.
We came up with a simple solution (always the best kind of solution). We call it a centering plate.
It mounts to the trailer, and then the arms of our hitch mount to it. We make a specific plate for each make and model of bike.
The 1250GS’s is offset tremendously to the left to be able to reach the spool on the left side. The Honda Africa Twin is quite symmetrical, and the centering plate is only offset a little. However, that small amount makes a big difference in making sure the ADV1 travels perfectly in line with the bike so you don’t feel the trailer (only the weight) at any speed or in any conditions.